Friday, December 25, 2009

Happy Christmas!!


Best Sugar Cookie Recipe Ever:
By Dulce Doll

2 cups flour
1 tsp. cream of tartar
1/2 tsp. baking soda
1/2 tsp. salt
3/4 cup sugar
1/2 cup melted butter
2 eggs
1 tsp. vanilla

Line baking sheets with parchment, set aside.

Mix together flour, cream of tartar, baking soda, and salt. Combine sugar and butter until well-blended. Beat eggs, and add them and vanilla to butter mixture. Gradually add flour mixture, beating after each addition.

Wrap dough tightly in plastic wrap and refrigerate until it can be easily handled. Roll dough out on a floured surface to 1/4-inch thick and cut into desired shapes.

Bake at 350 degrees until done, firm to the touch and just starting to become golden around edges. Time will vary depending on the size of your cookies.

Cool completely one wire racks and frost with you favorite icing and decorate as you see fit!

Mine are decorated with a very simple icing sugar/milk frosting (add milk to icing
sugar until you reach the desiredconsistency). I used different sprinkles and coconut
flakes to decorate (the coconut ones are very good!).

Merry Christmas!

xoxo

Wednesday, December 23, 2009

Peppermint Kisses


After I made the Marmalade Windows I had a bunch of egg whites left over so I made an omelette, and then I was full, but I still had more! I made a LOT of Marmalade Windows...

One of my favorite things that I don't eat enough of are meringues, so I decided to wing it and if it worked, great! And if it didn't, whatever.

Peppermint Kisses
By Dulce Doll

4 egg whites
3/4 cup sugar
3/4 tsp. pure peppermint extract

Preheat oven to 175 degrees. Line two baking sheets with parchment and set aside. Fit a large pastry bag with a star piping tip (Ateco 828), set aside.

Melt egg whites and sugar in a heat-proof bowl over a simmering pot of water. Stir constantly until dissolved and warm to the touch. Remove from heat.

With the whisk attachment, beat egg mixture on medium-high speed until stiff peaks form. Add peppermint extract.

Fill prepared piping bag with meringue and pipe star-shapes onto parchment. Bake until crisp, about 1 hour 45 minutes. Cool completely on wire racks.

Oh yeah. Then I dipped them in chocolate. Just sayin'!

Marmalade Windows


My Dad NEVER asks for anything so when the Christmas baking started this year and he dug this recipe out of my Mom's Martha Stewart Holiday Cookies 2001 magazine, I decided to surprise him with them, after my mother promptly said "no" to his request. When it comes to the Christmas baking she totally has an agenda, and let's be honest, she's the boss!

These took a little time, but are well worth the little extra effort. They are crumbly and buttery and delish! I simplified them a little from what the original recipe directs, as far as shape. I used a couple of round cutters that I had to create the "window" effect, while in the magazine and on the website they did proper rectangles that included far too much precise rolling and rulers and measuring for the 23rd of December. Really, you could get the desired effect with any two shaped cutters the same but different in size.

The one thing that I didn't like about this recipe is that the dough is not very forgiving, so get as much mileage as you can from each roll, I could only roll it a couple times, maybe three if very lucky because it's super sticky dough so you really need to flour your work space and rolling pin, and then by adding all the extra flour, it dries it out so it's falling apart! Kind of irritating, but I'll know for next time.

I will attach the link to the website so you can check that out as well, but here's what I did:

Marmalade Windows

1/2 pound (2 sticks) unsalted butter, room temperature
3/4 cup sugar
3 large egg yolks
1 tsp. vanilla extract
1 tbsp. orange liqueur or cognac
2 1/2 cups AP flour, plus more for rolling
1 1/2 tsp. baking powder
Pinch of salt
1/2 cup orange marmalade
1 tbsp. heavy cream

Have ready a baking sheet lined with parchment. In the bowl of an electric mixer fitted with the paddle attachment, beat butter and sugar on medium speed until light and fluffy, about 2 minutes. Add 2 egg yolks, and beat until well combined, 2 to 3 minutes. Beat in vanilla and liqueur. Add flour, baking powder, and salt; mix, beginning on low speed and increasing to medium, just until flour is incorporated.

Refrigerate dough for at least 1 hour.

Preheat oven to 350 degrees. Flour your work surface. Roll out to 1/4-inch thick, dustin with flour to prevent sticking. Cut out "base" of cookie, and then enough corresponding "tops" to pair all your cookies. Spread about a teaspoon of marmalade on top of each "bottom" and then place a "top" on each.


In a small bowl, whisk together the remaining egg yolk and cream. Carefully brush (or I used my finger!) tops with egg wash. Bake until golden, about 19 minutes, rotating once, halfway through. Transfer cookies to wire racks to cool.

Sunday, December 20, 2009

UGLY, But Delicious, and the BEST Darn Quiche EVER


I always thought that I would have officially reached adulthood when I owned a proper trifle bowl. That day happened two days ago, but I don't feel any different... Something I've always meant to purchase, but between "couldn't find one when I wanted to" and "not needing it when I saw one" I just never bought one until now.

I decided to host a small Christmas party for my friends and co-workers, a little wine and cheese gathering, to celebrate the holiday that is now bearing down on us. On the menu:

Baked Brie with Cranberry Compote (see horrific photo below)
Cheese and Bacon Quiche (recipe below)
Assorted Meats and Cheeses
Roasted Garlic
Fruit Platter
Banana Pudding (recipe below)

While keeping track of my favorite radio host, Mario Bosquez on Martha Stewart (of course) Radio Sirius 112, I discovered what is sure to become a staple in my household! Magnolia Bakery's Banana Pudding. Simple and elegant, and downright perfect, this dessert is well worth the extra steps in preparation.

I had trouble finding "instant" pudding mix at all three of the stores I went to, it was all marked "cooked", so I thought that possibly it was being called something different now. I brought the box home and followed the first "night before" steps of mixing the pudding mix with condensed milk and water. This of course did not look promising still after a few hours in the fridge. I was lucky enough to email and get a quick response back from Mario, who had just changed his facebook status to "Making Magnolia's EVIL Banana Pudding...", so perfect timing. He got back to me right away with the advice that he, too had challenges finding the instant pudding, but that it was pretty much necessary to get the proper consistency. I was gutted that I would potentially be dumping all my ingredients down the drain, so I took a chance and added the liquid to a medium-sized pot and cooked it. Worked perfectly! The pudding thickened almost immediately by following the original cooking instructions off the Jell-O box. I love it when a plan comes together...

Also, I used bananas that were not yet too ripe, and am I ever glad I did! There is quite a bit left over from last night, and I just had another serving and the bananas held up overnight in the fridge great. Not too soggy, just starting to get really sweet and ripe, and of course everything is better the next day - flavors merged. Yum!

Magnolia's Famous Banana Pudding

1 14-ounce can sweetened condensed milk
1 1/2 cups ice cold water
1 3.4-ounce package instant vanilla pudding mix (preferable Jell-O brand)
3 cups heavy cream
1 12-ounce box Nabisco Nilla Wafers
4 cups sliced ripe bananas

In a small bowl, on the medium speed of an electric mixer, beat together the sweetened condensed milk and water until well combined, about 1 minute. Add the pudding mix and beat well, about 2 minutes more. Cover and refrigerate for 3-4 hours or overnight, before continuing. It is very important to allow the proper amount of time for the pudding mixture to set.

In a large bowl, on the medium speed of an electric mixer, whip the heavy cream until stiff peaks form. Gently fold the pudding mixture into the whipped cream until well blended and no streaks of pudding remain.

To assemble the dessert, select a large, wide bowl (preferably glass) with a 4-5-quart capacity. Arrange one-third of the wafers to cover the bottom of the bowl, overlapping if necessary, then one-third of the bananas, and one-third of the pudding. Repeat the layering twice more. Cover tightly with plastic wrap and allow to chill in the refrigerator for 4 hours, or up to 8 hours, but no longer before serving.

*Note: I did not cover with plastic wrap because it would have squished the top and it set just fine, no drying out, it was flawless.

See how pretty it is before serving??


I LOVE this quiche recipe. It's my old stand-by from the Fannie Farmer Cookbook.

Cheese and Bacon Quiche

10 slices bacon, fried crisp and crumbled
1 partially baked Tart Pastry, without sugar (recipe below)
4 eggs
2 cups light cream (half and half)
1/2 tsp. salt
1/8 tsp. nutmeg
Pinch of cayenne pepper
1 1/4 cups grated Swiss cheese

Preheat the oven to 425 degrees. Sprinkle bacon over the bottom of the tart shell. Combine eggs, cream, salt, nutmeg, and cayenne pepper in a bowl and beat to mix thoroughly. Sprinkle the cheese over the bacon and ladle the custard over all. Bake for 15 minutes at 425 degrees, then lower the heat to 350 degrees and bake for 30 minutes more, or until a knife inserted in the center comes out clean. Serve hot or cold.

Tart Pastry

You may sweeten this recipe if you wish, by adding 1 1/2 tablespoons of sugar to the flour. This pastry will not get tough if you have to handle it a lot and you can mix it in a food processor.

1 cup AP flour
1/4 tsp. salt
6 tbsp. cold butter, in small pieces
1 egg yolk

Mix the flour and salt in the bowl of food processor until it resembles coarse meal or tiny peas. Whisk together the egg yolk and 2 tablespoons water together in another bowl, add to flour mixture, and pulse until the pastry is smooth and will hold together in a ball. Wrap in plastic and refrigerate for at least 20 minutes.

Roll out and place in whatever type of pan you wish, prick the bottom with a fork and pre-bake at 425 degrees, unfilled, for about 12 minutes.


And P.S., I'm eating my second helping of pudding today. Mario was right. EVIL.

Tuesday, December 8, 2009

Shortbread Part Deux


I featured this shortbread recipe in an earlier post, but I made it again, so here it is again! This time it's green, and piped as trees. I have to say again, I cannot believe I didn't buy a cookie press until recently. It makes fast, impressive work of your favorite shortbread or butter cookie recipe.

Here's a link to the original post, but for your convenience, here's the recipe again. So easy, so buttery, so perfect for Christmas giving and enjoying.

This time, clearly, I tinted them green and sprinkled them with red sanding sugar prior to baking.


Ingredients:

2 cups unsalted butter, room temperature
1 cup powdered sugar
3 1/2 cups flour

Directions:

In a large bowl, beat butter with sugar until blended. Add flour in batches.

When completely incorporated, bake at 350 degrees until done, about 11 minutes.


And The Christmas Baking Begins!


I kicked off my Christmas baking with my obligation to my work cookie exchange. I wanted to make something that would really wow the others participants!

Every year I make these cookies. I LOVE them. They are chewy and chocolatey, rich and moist. They are spicy and extravagant, with bold ingredients such as cloves, nutmeg, as well as powdered ginger paired with freshly grated ginger. Like always, use the very best quality chocolate you can find. They are a lot less work and less mess than you would expect for the sophisticated result.

This recipe comes straight from Martha's website. I originally found it in the magazine back in 1997, and it's been printed and reprinted in several publications and cookie books since.

If you like spice, like I do, go a little heavier on the grated ginger to experience a full flavor.

Chewy Chocolate Gingerbread

7 oz. best-quality semisweet chocolate
1 1/2 cups AP flour
1 1/4 tsp. ground ginger
1 tsp. ground cinnamon
1/4 tsp. ground cloves
1/4 tsp. ground nutmeg
1 tbsp. cocoa powder
1/4 cup (1 stick) unsalted butter
1 tbsp. freshly grated ginger
1/2 cup dark-brown sugar, packed
1/2 cup unsulfured molasses
1 tsp. baking soda
1/4 cup granulated sugar

Line two baking sheets with parchment. Chop chocolate into 1/4-inch chunks; set aside. In a medium bowl, sit together flour, grounds ginger, cinnamon, cloves, nutmeg, and cocoa.

In the bowl of an electric mixer, fitted with the paddle attachment, beat butter and grated ginger until whitened, about 4 minutes. Add brown sugar; beat until combined. Add molasses; beat until combined.

In a small bowl, dissolve baking soda in 1 1/2 teaspoons boiling water. Beat half of flour mixture into butter mixture. Beat in baking soda mixture, then remaining half of flour mixture.

Mix in chocolate; turn out onto a piece of plastic wrap. Refrigerate until firm, 2 hours or overnight.

Heat oven to 325 degrees. Roll dough into 1 1/2-inch balls; roll in granulated sugar. Place balls 2 inches apart on prepared baking sheets, and bake until the surfaces crack slightly, 10 to 12 minutes. Let cool 5 minutes; transfer to wire racks to cool completely.

Enjoy!

Sunday, November 15, 2009

Lazy Sunday


Chocolate cake in a pinch. Sounds too good to be true, but this one is straight-up the simplest chocolate cake recipe ever! I guarantee you already have most of the ingredients in your kitchen, and the mess is minimal, as you mix everything together in the pan that you bake it in.

The idea for this recipe came from Everyday Food. I altered it slightly, adding more cocoa, less salt, and omitting the cold water, instead adding a cup of cold coffee, because coffee adds more depth and flavor to chocolate cake. Plus, it gave me another opportunity to use my favorite new kitchen helper, Starbucks VIA. I plan to revisit this again, and try to improve it even more.

It popped out of the pan very nicely, without leaving anything behind, which was a plus, however, it lacked that deep fudgy chocolatey flavor that I love. It was great for the amount of time and effort it took, still, miles better than a box cake, but stay tuned, I'll be working on it.

Here's how I did it:

Lazy Sunday Chocolate Cake
by Dulce Doll

1 1/2 cups AP flour
1 cup sugar
4 tbsp. best quality cocoa powder
1 tsp. baking soda
1/4 tsp salt
6 tbsp. vegetable oil
1 tsp. pure vanilla extract
1 tbsp. white vinegar
1 packet Starbucks VIA dissolved in 1 cup cold water

Preheat oven to 350 degrees

In a 9-inch square baking dish, whisk together all the dry ingredients. Make a well in the center and add the wet ingredients. Whisk together until well combined, making sure to check right to the bottom of the pan for dry ingredients stuck in corners.

Bake 35 minutes or until a cake tester inserted comes out clean. Let cool completely before removing from pan.

Frost with your choice of icing, or just eat it right out of the pan! I used some leftover Coffee Buttercream that I had in the freezer. Enjoy!

Makes about 8 (or 1) servings.


* To follow up, I was too quick to judge this cake! It was totally fudgy and moist the next day.

Wednesday, November 4, 2009

A Little Late, But Still...

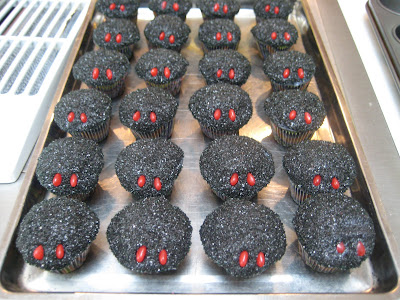
So, since I was making Christmas cupcakes at Halloween (see earlier post), I decided to post the super-cute spider cupcakes I made last year for Halloween. I used mini cupcake pans and made LOTS of them! And they were such a hit, I used Ina Garten's coconut cake recipe that I found on marthastewart.com.

Please excuse the shoddy photography, I wasn't blogging at that point, and I took the pictures just for fun. Not to say that I think that my more recent photos could be considered amazing by any stretch, but I think an improvement on last year's, for sure.

I added black gel food coloring to both the cake batter, and the frosting, enough to make it really black, and then dipped the tops into black sprinkles to give them a sparkly finish. For the legs, I used black licorice wheels which I pulled apart and cut to size. For the scary little red eyes, I used mini cinnamon hearts, which I cut in half.

These were a lot of fun to make, and they were very well received at the party I took them to (not to mention, how moist and delicious they were!). I've provided the recipe as I used it for these cupcakes, but also the link the the original recipe, because it is slightly different and I would recommend using these cupcakes any time, not just Halloween.

Ina's Coconut Cupcakes:

3 cups cake flour
1 tsp. baking powder
1/2 tsp. baking soda
1/2 tsp. salt
5 large eggs
3/4 lb. (3 sticks) unsalted butter, room temperature
2 cups sugar
1 1/2 tsp. pure vanilla extract
1 1/2 tsp. almond extract
1 cup buttermilk
1/2 lb. sweetened flake coconut
Black gel coloring

Directions:

Heat oven to 350 degrees. Sift the dry ingredients together into a medium mixing bowl, and set aside. Break eggs into a small bowl, and set aside.

In the bowl of an electric mixer fitted with the paddle attachment, cream butter and sugar until light and fluffy, 3 to 5 minutes. With the mixer running, carefully pour in eggs and vanilla and almond extracts.

Mix in the flour mixture and buttermilk by alternating between 1 cup flour and 1/2 cup buttermilk; be sure to start and end with the flour mixture. Add the coconut, and mix until incorporated. Add enough black gel coloring to turn the batter very black.

Line a cupcake tin with paper liners. Fill each cup with batter using an ice cream scoop with a 1/4-cup capacity; the batter should nearly reach the tops of the cups. Bake until a cake tester inserted comes out clean, 25 to 30 minutes.

Remove cupcakes from the oven, and allow them to cool briefly in the tin before transferring them to a wire rack to cool completely, about 45 minutes.

Cream Cheese Frosting:

8 oz. cream cheese, room temperature
8 tbsp. (1 stick) unsalted butter, cut into pieces, room temperature
1 cup confectioners' sugar
1 tsp. pure vanilla extract
Black gel coloring

Place cream cheese in a medium mixing bowl. Using a rubber spatula, soften cream cheese. Gradually add butter, and continue beating until smooth and well blended. Sift in sugar, and continue beating until smooth. Add vanilla and enough black gel coloring to tint completely, and stir to combine.

Decorating instructions are pretty self-explanatory from the pictures. Have fun!

Ready for their legs!

This was just a fraction of what the recipe actually made.

Wednesday, October 28, 2009

Chocolate Cupcakes


Happy holidays! Okay, a little early, I know, but where I work, Santa's coming on Monday night.

Okay, so remember the time I said I was taking a break from baking in an attempt at cleansing, and cutting back on the sugar in my diet? Because it's quite clear to me that I have zero resistance to the things I bake. Yeah, so about the detox - didn't really work so well. I think it lasted for maybe 24 hours, and then, let's be honest, I got way to busy to keep up with all the prep! Soon though...

Needless to say, I'm back! Tomorrow night is my store's holiday roll-out meeting, so in the spirit of Christmas (two months early!), I made cute Christmasy cupcakes for my staff.

This time I made my Grandmother's chocolate cake recipe, and piped Magnolia Bakery's vanilla buttercream on top. Perfect combination! As much as I love the Trophy Cupcake chocolate cake recipe, this one is my absolute all-time, moistest, most delicious cake recipe. Whenever a recipe calls for coffee, I always fire up my espresso machine and make an americano to get the best quality, we all know instant coffee is awful. Again, however, with the recent launch of their new product, I was able to use Starbucks VIA ready-brew with this cake, and it was such a help. It's also a very helpful product for this cake because the recipe calls for both hot and cold coffee, and VIA is totally soluble in hot or cold water. And I can't get enough of this buttercream! So simple to make and pipe.

I used a large round #808 piping tip this time and squeezed a small amount on each top, pulling it up at the end to form kind of a Hershey Kiss shape.

To get a perfectly rounded cupcake, I used exactly 1/4 cup of batter in a large-size cupcake paper.

Here it is (Top Secret!):
Perfect Chocolate Cake
By Dulce Doll

1 cup granulated sugar
1 cup butter, room temperature
4 eggs, beaten
2 cup brown sugar
1 cup cocoa
1 cup hot coffee (1 package Starbucks VIA Italian Roast)
2 tsp. baking soda, dissolved in a little hot coffee
2 1/2 cups AP flour
1 cup cold coffee (1 package Starbucks VIA Italian Roast)

Preheat oven to 350 degrees.

Cream granulated sugar and butter together. Pour eggs on top, but do not stir yet.

Add brown sugar, cocoa, and hot coffee. Beat until well blended.

Finally, beat in baking soda, flour (in a couple additions), and cold coffee. When smooth, divide evenly among lined muffin tins. Will make approximately 36 cupcakes or 4 9-inch cake layers.

Bake for 17 minutes or until a toothpick inserted comes out clean. Cool completely .

Vanilla Buttercream:

1 cup unsalted butter, softened
6 to 8 cups confectioners' sugar
1/2 cup milk
2 tsp. pure vanilla extract

Combine butter, 4 cups sugar, milk, and vanilla. Beat until smooth and creamy. Gradually add remaining sugar, 1 cup at a time, until icing reaches desired consistency; you may not need to add all the sugar. Store in an airtight container for up to 3 days.

Friday, October 16, 2009

Sad But True...

You won't be seeing the Dulce Doll for a while (or at least you better not). I'm trying a two week detox and cutting sugar out of my diet! Check back around Halloween...

Saturday, October 10, 2009

Chocolate Caramel Tart


This was probably by far the most time consuming dessert I've made. It really was relatively simple, but took a looooong time, lots of steps, cooling, heating, cooling again, etc.

It won't take quite as long next time; I made three tarts tonight, and made the caramel twice, feeling it out the first time, just in case. I bought a new candy thermometer, and still, it was ready about 15 degrees before what the recipe calls for.

This is the second time I've made caramel, and it turned out great. Very smooth and buttery! The crust was so easy, a chocolatey cookie-like dough that released very easily from the pans.

This is a VERY rich dessert. Definitely needs to be paired with an espresso macchiato or a giant glass of ice cold milk!

This recipe was originally the cover picture of Saveur's April 2009 issue. It was so impressive looking I knew I'd have to make it sooner or later. It was featured in the article "Restaurants That Matter", and comes from Marlow & Sons Restaurant in Brooklyn.

For the Crust:
1 1/2 cups flour
1/4 cup plus 1 tbsp. unsweetened cocoa powder
1/4 tsp. kosher salt
10 tbsp. unsalted butter, cubed and softened
1/2 cup plus 2 tbsp. confectioners' sugar
2 egg yolks, room temperature
1/2 tsp. pure vanilla extract

For the Caramel:
1 1/2 cups sugar
3 tbsp. light corn syrup
1/4 tsp. kosher salt
6 tbsp. unsalted butter
6 tbsp. geavy cream
1 tbsp. * creme fraiche

For the Ganache:
1/2 cup heavy cream
4 oz. bittersweet chocolate, finely chopped

Make the crust: Heat oven to 350 degrees. Combine flour, cocoa powder, and salt in a medium bowl and set aside. Using a handheld mixer, cream the butter and sugar in a large bowl until mixture is pale and fluffy; mix in yolks, and vanilla. Mix in dry ingredients. Transfer dough to a 9" fluted tart pan with a removable bottom and press dough evenly in bottom and sides of pan. Refrigerate for 30 minutes. Prick the shell all over with a fork and bake until cooked through, about 20 minutes. Transfer to a rack and cool.

Make the caramel: In a 1-qt. saucepan, whisk together sugar, corn syrup, salt, and 6 tbsp. water and bring to a boil. Cook, without stirring, until a candy thermometer inserted reads 365 degrees.

Remove pan from heat and whisk in butter, cream, and creme fraiche (the mixture wil bubble up) until smooth. Pour caramel into cooled tart shell and let cool slightly; refrigerate until firm, 4 to 5 hours.

Make the ganache: Bring cream to a boil in a 1-qt. saucepan over medium heat. Put chocolate into a medium bowl and pour in hot cream; let sit for 1 minute, then stir slowly with a rubber spatula until smooth.


Pour ganache evenly over tart and refrigerate until set, 4 to 5 hours. Sprinkle tart with sea salt if desired, slice, and serve chilled.

* Creme fraiche can be made simply by whisking equal parts sour cream and heavy cream. Use immediately or let sit at room temperature to sour.

Saturday, October 3, 2009

Pumpkin Cheesecake


And here is yet another fool-proof recipe from the Martha Stewart website. I know. Enough already. There's a lot of Martha haters out there.

This recipe was extremely simple. It was actually my first cheesecake, which I was anxious about, I've always thought cheesecake could be one of those things you could really screw up. Alas, I was successful! And it'll be a great alternative to pumpkin pie with Thanksgiving and Christmas right around the corner...

It killed me to not open the door while it was sitting (unfortunately I'm one of those who always needs to do what I'm told not to), but I didn't, and I think this is what prevented the top from cracking.

The pumpkin taste was subtle and the texture was perfect.

Pumpkin Cheesecake

For the Crust:
1 1/4 cups graham cracker crumbs (about 10 whole crackers)
1/4 cup sugar
4 tbsp. unsalted butter, melted

For the Filling:
4 packages (8 oz. each) bar cream cheese, very soft
1 1/4 cups sugar
3 tbsp. AP flour
1 cup pumpkin puree
2 tbsp. pumpkin pie spice
1 tbsp. vanilla extract
1/2 tsp. salt
4 large eggs, room temperature

Preheat oven to 350 degrees, with rack in center. Assmble a 9-inch nonstick springform pan, with the raised side of the bottom part facing up.

Make the crust: In a medium bowl, mix graham crumbs, sugar, and butter until moistened; press firmly into the bottom of pan. Bake until golden around edges, 10 to 12 minutes.

Make the filling: With an electric mixer, beat cream cheese and sugar on low speed until smooth; mix in flour (do not overmix). Add pumpkin puree, pie spice, vanilla, and salt; mix just until smooth. Add eggs one at a time, mixing until each is incorporated before adding the next.

Place springform pan on a rimmed baking sheet. Pour filling into springform, and gently smooth top. Transfer to oven; reduce oven heat to 300 degrees. Bake 45 minutes. Turn off oven; let cheesecake stay in oven 2 hours more (without opening).


Remove from oven; cool completely. Cover with plastic wrap; refrigerate until firm, at least 4 hours. Unmold before serving.


Sunday, September 27, 2009

Mocha Cupcakes


Starbucks is getting ready to launch their new product, VIA Ready Brew Coffee all across North America, so I took it as the perfect opportunity to make some coffee-based treats.

Mocha Cupcakes and Coffee Buttercream. They are really delicious, a little too much coffee flavor for my liking, so I didn't eat a whole one. But coffee lovers will love them!

Again, used my little cups, which I'm really starting to love. I saw another blog that has a step by step on how to get the cupcake out of the cup, by pulling open all the pleats and they just pop right out. Easy.

My first complaint about a MS recipe: this is not the moistest cake, and all I did to alter it was change regular espresso to Starbucks VIA. No offense Martha.

Mocha Cupcakes
Adapted From Martha Stewart Cupcakes

2 1/4 cups cake flour, sifted
2 tbsp. unsweetened cocoa powder
1/2 cup unsalted butter, room temperature
1 1/2 cups packed light-brown sugar
2 eggs, room temperature
1 tsp. pure vanilla extract
1 1/2 tsp. baking soda
1/4 tsp. salt
1/2 cup sour cream
4 packets Starbucks Italian Roast VIA Ready Brew dissolved in 3/4 cup boiling water

Preheat oven to 325 degrees.

Whisk together cake flour and cocoa. Cream butter until smooth. Add the brown sugar and eggs; beat until fluffy. Add vanilla, baking soda, and salt; beat to combine thoroughly.

Add flour mixture to wet ingredients in three batches, alternating with sour cream, and beating until just combined after each. Add coffee to batter and beat until smooth.

Divide batter evenly among regular cupcake paper-lined muffin tins, or paper cups.

Bake, rotating tins halfway through, until a cake tester inserted comes out clean, about 22 minutes. Cool completely.


Coffee Buttercream
By Dulce Doll

1 cup unsalted butter, room temperature
1/2 cup heavy cream
4 packets Starbucks Columbia VIA Ready Brew dissolved in 2 tbsp. boiling water
4 to 6 cups confectioners sugar

Cream butter and 2 cups sugar together. Add cream, coffee, and 2 more cups sugar. Keep stirring and adding sugar until you have a workable consistency.


Saturday, September 26, 2009

PB and J


Here's a new twist on a classic flavor pairing. I picked up my October Martha Stewart Living today and this recipe was the last one featured in the book.

They worked out pretty well, and I was able to use the Blackberry Jam I made and blogged about in this post. The recipe calls for raspberry jam, but mmmmm blackberry. And don't worry, it is my jam, but in an old Traverso's jam jar that I love (plus, I had more jam than I did jars at the time!).

Also, I changed the recipe a little, it calls for the jam to be added to the cookies after they're cooled, and I added it part way through baking, I like jam after it's been in the oven a bit and caramelized some.

Peanut Butter and Jelly Thumbprints

1 1/4 cups AP flour
1/2 tsp. baking powder
1/2 tsp. baking soda
1/2 tsp. salt
3/4 cup smooth peanut butter
1/2 cup unsalted butter, room temperature
1/3 cup packed light-brown sugar
1/3 cup granulated sugar, plus more for rolling
1 large egg
1 tsp. pure vanilla extract
1/2 cup raspberry jam


Preheat oven to 350 degrees. Whisk together flour, baking powder, baking soda, and salt. Beat peanut butter and butter until smooth. Add sugars and beat until light and fluffy. Add egg and vanilla, and beat until incorporated. Add dry ingredients, and mix until combined.

Scoop level tablespoons of dough and form into balls. Roll each ball in granulated sugar, and transfer to parchment-lined baking sheets, spacing about 2-inches apart.

Bake until cookies are puffy, about 10 minutes. Remove from oven, and make indentations in centers by pressing with the handle end of a wooden spoon.

Scoop a small amount of jam into each indentation and return cookies to oven and bake until edges are golden, 6 to 7 minutes more.

Transfer cookies to wire racks and cool completely.

Cookies can be stored for up to 1 week.

Makes about 40 cookies.