Tuesday, December 8, 2009

And The Christmas Baking Begins!


I kicked off my Christmas baking with my obligation to my work cookie exchange. I wanted to make something that would really wow the others participants!

Every year I make these cookies. I LOVE them. They are chewy and chocolatey, rich and moist. They are spicy and extravagant, with bold ingredients such as cloves, nutmeg, as well as powdered ginger paired with freshly grated ginger. Like always, use the very best quality chocolate you can find. They are a lot less work and less mess than you would expect for the sophisticated result.

This recipe comes straight from Martha's website. I originally found it in the magazine back in 1997, and it's been printed and reprinted in several publications and cookie books since.

If you like spice, like I do, go a little heavier on the grated ginger to experience a full flavor.

Chewy Chocolate Gingerbread

7 oz. best-quality semisweet chocolate
1 1/2 cups AP flour
1 1/4 tsp. ground ginger
1 tsp. ground cinnamon
1/4 tsp. ground cloves
1/4 tsp. ground nutmeg
1 tbsp. cocoa powder
1/4 cup (1 stick) unsalted butter
1 tbsp. freshly grated ginger
1/2 cup dark-brown sugar, packed
1/2 cup unsulfured molasses
1 tsp. baking soda
1/4 cup granulated sugar

Line two baking sheets with parchment. Chop chocolate into 1/4-inch chunks; set aside. In a medium bowl, sit together flour, grounds ginger, cinnamon, cloves, nutmeg, and cocoa.

In the bowl of an electric mixer, fitted with the paddle attachment, beat butter and grated ginger until whitened, about 4 minutes. Add brown sugar; beat until combined. Add molasses; beat until combined.

In a small bowl, dissolve baking soda in 1 1/2 teaspoons boiling water. Beat half of flour mixture into butter mixture. Beat in baking soda mixture, then remaining half of flour mixture.

Mix in chocolate; turn out onto a piece of plastic wrap. Refrigerate until firm, 2 hours or overnight.

Heat oven to 325 degrees. Roll dough into 1 1/2-inch balls; roll in granulated sugar. Place balls 2 inches apart on prepared baking sheets, and bake until the surfaces crack slightly, 10 to 12 minutes. Let cool 5 minutes; transfer to wire racks to cool completely.

Enjoy!

Sunday, November 15, 2009

Lazy Sunday


Chocolate cake in a pinch. Sounds too good to be true, but this one is straight-up the simplest chocolate cake recipe ever! I guarantee you already have most of the ingredients in your kitchen, and the mess is minimal, as you mix everything together in the pan that you bake it in.

The idea for this recipe came from Everyday Food. I altered it slightly, adding more cocoa, less salt, and omitting the cold water, instead adding a cup of cold coffee, because coffee adds more depth and flavor to chocolate cake. Plus, it gave me another opportunity to use my favorite new kitchen helper, Starbucks VIA. I plan to revisit this again, and try to improve it even more.

It popped out of the pan very nicely, without leaving anything behind, which was a plus, however, it lacked that deep fudgy chocolatey flavor that I love. It was great for the amount of time and effort it took, still, miles better than a box cake, but stay tuned, I'll be working on it.

Here's how I did it:

Lazy Sunday Chocolate Cake
by Dulce Doll

1 1/2 cups AP flour
1 cup sugar
4 tbsp. best quality cocoa powder
1 tsp. baking soda
1/4 tsp salt
6 tbsp. vegetable oil
1 tsp. pure vanilla extract
1 tbsp. white vinegar
1 packet Starbucks VIA dissolved in 1 cup cold water

Preheat oven to 350 degrees

In a 9-inch square baking dish, whisk together all the dry ingredients. Make a well in the center and add the wet ingredients. Whisk together until well combined, making sure to check right to the bottom of the pan for dry ingredients stuck in corners.

Bake 35 minutes or until a cake tester inserted comes out clean. Let cool completely before removing from pan.

Frost with your choice of icing, or just eat it right out of the pan! I used some leftover Coffee Buttercream that I had in the freezer. Enjoy!

Makes about 8 (or 1) servings.


* To follow up, I was too quick to judge this cake! It was totally fudgy and moist the next day.

Wednesday, November 4, 2009

A Little Late, But Still...

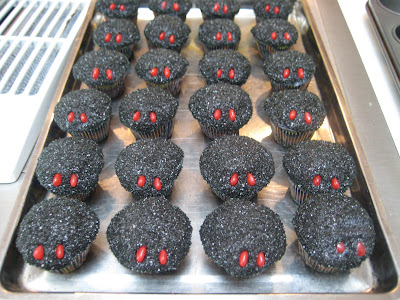
So, since I was making Christmas cupcakes at Halloween (see earlier post), I decided to post the super-cute spider cupcakes I made last year for Halloween. I used mini cupcake pans and made LOTS of them! And they were such a hit, I used Ina Garten's coconut cake recipe that I found on marthastewart.com.

Please excuse the shoddy photography, I wasn't blogging at that point, and I took the pictures just for fun. Not to say that I think that my more recent photos could be considered amazing by any stretch, but I think an improvement on last year's, for sure.

I added black gel food coloring to both the cake batter, and the frosting, enough to make it really black, and then dipped the tops into black sprinkles to give them a sparkly finish. For the legs, I used black licorice wheels which I pulled apart and cut to size. For the scary little red eyes, I used mini cinnamon hearts, which I cut in half.

These were a lot of fun to make, and they were very well received at the party I took them to (not to mention, how moist and delicious they were!). I've provided the recipe as I used it for these cupcakes, but also the link the the original recipe, because it is slightly different and I would recommend using these cupcakes any time, not just Halloween.

Ina's Coconut Cupcakes:

3 cups cake flour
1 tsp. baking powder
1/2 tsp. baking soda
1/2 tsp. salt
5 large eggs
3/4 lb. (3 sticks) unsalted butter, room temperature
2 cups sugar
1 1/2 tsp. pure vanilla extract
1 1/2 tsp. almond extract
1 cup buttermilk
1/2 lb. sweetened flake coconut
Black gel coloring

Directions:

Heat oven to 350 degrees. Sift the dry ingredients together into a medium mixing bowl, and set aside. Break eggs into a small bowl, and set aside.

In the bowl of an electric mixer fitted with the paddle attachment, cream butter and sugar until light and fluffy, 3 to 5 minutes. With the mixer running, carefully pour in eggs and vanilla and almond extracts.

Mix in the flour mixture and buttermilk by alternating between 1 cup flour and 1/2 cup buttermilk; be sure to start and end with the flour mixture. Add the coconut, and mix until incorporated. Add enough black gel coloring to turn the batter very black.

Line a cupcake tin with paper liners. Fill each cup with batter using an ice cream scoop with a 1/4-cup capacity; the batter should nearly reach the tops of the cups. Bake until a cake tester inserted comes out clean, 25 to 30 minutes.

Remove cupcakes from the oven, and allow them to cool briefly in the tin before transferring them to a wire rack to cool completely, about 45 minutes.

Cream Cheese Frosting:

8 oz. cream cheese, room temperature
8 tbsp. (1 stick) unsalted butter, cut into pieces, room temperature
1 cup confectioners' sugar
1 tsp. pure vanilla extract
Black gel coloring

Place cream cheese in a medium mixing bowl. Using a rubber spatula, soften cream cheese. Gradually add butter, and continue beating until smooth and well blended. Sift in sugar, and continue beating until smooth. Add vanilla and enough black gel coloring to tint completely, and stir to combine.

Decorating instructions are pretty self-explanatory from the pictures. Have fun!

Ready for their legs!

This was just a fraction of what the recipe actually made.

Wednesday, October 28, 2009

Chocolate Cupcakes


Happy holidays! Okay, a little early, I know, but where I work, Santa's coming on Monday night.

Okay, so remember the time I said I was taking a break from baking in an attempt at cleansing, and cutting back on the sugar in my diet? Because it's quite clear to me that I have zero resistance to the things I bake. Yeah, so about the detox - didn't really work so well. I think it lasted for maybe 24 hours, and then, let's be honest, I got way to busy to keep up with all the prep! Soon though...

Needless to say, I'm back! Tomorrow night is my store's holiday roll-out meeting, so in the spirit of Christmas (two months early!), I made cute Christmasy cupcakes for my staff.

This time I made my Grandmother's chocolate cake recipe, and piped Magnolia Bakery's vanilla buttercream on top. Perfect combination! As much as I love the Trophy Cupcake chocolate cake recipe, this one is my absolute all-time, moistest, most delicious cake recipe. Whenever a recipe calls for coffee, I always fire up my espresso machine and make an americano to get the best quality, we all know instant coffee is awful. Again, however, with the recent launch of their new product, I was able to use Starbucks VIA ready-brew with this cake, and it was such a help. It's also a very helpful product for this cake because the recipe calls for both hot and cold coffee, and VIA is totally soluble in hot or cold water. And I can't get enough of this buttercream! So simple to make and pipe.

I used a large round #808 piping tip this time and squeezed a small amount on each top, pulling it up at the end to form kind of a Hershey Kiss shape.

To get a perfectly rounded cupcake, I used exactly 1/4 cup of batter in a large-size cupcake paper.

Here it is (Top Secret!):
Perfect Chocolate Cake
By Dulce Doll

1 cup granulated sugar
1 cup butter, room temperature
4 eggs, beaten
2 cup brown sugar
1 cup cocoa
1 cup hot coffee (1 package Starbucks VIA Italian Roast)
2 tsp. baking soda, dissolved in a little hot coffee
2 1/2 cups AP flour
1 cup cold coffee (1 package Starbucks VIA Italian Roast)

Preheat oven to 350 degrees.

Cream granulated sugar and butter together. Pour eggs on top, but do not stir yet.

Add brown sugar, cocoa, and hot coffee. Beat until well blended.

Finally, beat in baking soda, flour (in a couple additions), and cold coffee. When smooth, divide evenly among lined muffin tins. Will make approximately 36 cupcakes or 4 9-inch cake layers.

Bake for 17 minutes or until a toothpick inserted comes out clean. Cool completely .

Vanilla Buttercream:

1 cup unsalted butter, softened
6 to 8 cups confectioners' sugar
1/2 cup milk
2 tsp. pure vanilla extract

Combine butter, 4 cups sugar, milk, and vanilla. Beat until smooth and creamy. Gradually add remaining sugar, 1 cup at a time, until icing reaches desired consistency; you may not need to add all the sugar. Store in an airtight container for up to 3 days.

Friday, October 16, 2009

Sad But True...

You won't be seeing the Dulce Doll for a while (or at least you better not). I'm trying a two week detox and cutting sugar out of my diet! Check back around Halloween...

Saturday, October 10, 2009

Chocolate Caramel Tart


This was probably by far the most time consuming dessert I've made. It really was relatively simple, but took a looooong time, lots of steps, cooling, heating, cooling again, etc.

It won't take quite as long next time; I made three tarts tonight, and made the caramel twice, feeling it out the first time, just in case. I bought a new candy thermometer, and still, it was ready about 15 degrees before what the recipe calls for.

This is the second time I've made caramel, and it turned out great. Very smooth and buttery! The crust was so easy, a chocolatey cookie-like dough that released very easily from the pans.

This is a VERY rich dessert. Definitely needs to be paired with an espresso macchiato or a giant glass of ice cold milk!

This recipe was originally the cover picture of Saveur's April 2009 issue. It was so impressive looking I knew I'd have to make it sooner or later. It was featured in the article "Restaurants That Matter", and comes from Marlow & Sons Restaurant in Brooklyn.

For the Crust:
1 1/2 cups flour
1/4 cup plus 1 tbsp. unsweetened cocoa powder
1/4 tsp. kosher salt
10 tbsp. unsalted butter, cubed and softened
1/2 cup plus 2 tbsp. confectioners' sugar
2 egg yolks, room temperature
1/2 tsp. pure vanilla extract

For the Caramel:
1 1/2 cups sugar
3 tbsp. light corn syrup
1/4 tsp. kosher salt
6 tbsp. unsalted butter
6 tbsp. geavy cream
1 tbsp. * creme fraiche

For the Ganache:
1/2 cup heavy cream
4 oz. bittersweet chocolate, finely chopped

Make the crust: Heat oven to 350 degrees. Combine flour, cocoa powder, and salt in a medium bowl and set aside. Using a handheld mixer, cream the butter and sugar in a large bowl until mixture is pale and fluffy; mix in yolks, and vanilla. Mix in dry ingredients. Transfer dough to a 9" fluted tart pan with a removable bottom and press dough evenly in bottom and sides of pan. Refrigerate for 30 minutes. Prick the shell all over with a fork and bake until cooked through, about 20 minutes. Transfer to a rack and cool.

Make the caramel: In a 1-qt. saucepan, whisk together sugar, corn syrup, salt, and 6 tbsp. water and bring to a boil. Cook, without stirring, until a candy thermometer inserted reads 365 degrees.

Remove pan from heat and whisk in butter, cream, and creme fraiche (the mixture wil bubble up) until smooth. Pour caramel into cooled tart shell and let cool slightly; refrigerate until firm, 4 to 5 hours.

Make the ganache: Bring cream to a boil in a 1-qt. saucepan over medium heat. Put chocolate into a medium bowl and pour in hot cream; let sit for 1 minute, then stir slowly with a rubber spatula until smooth.


Pour ganache evenly over tart and refrigerate until set, 4 to 5 hours. Sprinkle tart with sea salt if desired, slice, and serve chilled.

* Creme fraiche can be made simply by whisking equal parts sour cream and heavy cream. Use immediately or let sit at room temperature to sour.

Saturday, October 3, 2009

Pumpkin Cheesecake


And here is yet another fool-proof recipe from the Martha Stewart website. I know. Enough already. There's a lot of Martha haters out there.

This recipe was extremely simple. It was actually my first cheesecake, which I was anxious about, I've always thought cheesecake could be one of those things you could really screw up. Alas, I was successful! And it'll be a great alternative to pumpkin pie with Thanksgiving and Christmas right around the corner...

It killed me to not open the door while it was sitting (unfortunately I'm one of those who always needs to do what I'm told not to), but I didn't, and I think this is what prevented the top from cracking.

The pumpkin taste was subtle and the texture was perfect.

Pumpkin Cheesecake

For the Crust:
1 1/4 cups graham cracker crumbs (about 10 whole crackers)
1/4 cup sugar
4 tbsp. unsalted butter, melted

For the Filling:
4 packages (8 oz. each) bar cream cheese, very soft
1 1/4 cups sugar
3 tbsp. AP flour
1 cup pumpkin puree
2 tbsp. pumpkin pie spice
1 tbsp. vanilla extract
1/2 tsp. salt
4 large eggs, room temperature

Preheat oven to 350 degrees, with rack in center. Assmble a 9-inch nonstick springform pan, with the raised side of the bottom part facing up.

Make the crust: In a medium bowl, mix graham crumbs, sugar, and butter until moistened; press firmly into the bottom of pan. Bake until golden around edges, 10 to 12 minutes.

Make the filling: With an electric mixer, beat cream cheese and sugar on low speed until smooth; mix in flour (do not overmix). Add pumpkin puree, pie spice, vanilla, and salt; mix just until smooth. Add eggs one at a time, mixing until each is incorporated before adding the next.

Place springform pan on a rimmed baking sheet. Pour filling into springform, and gently smooth top. Transfer to oven; reduce oven heat to 300 degrees. Bake 45 minutes. Turn off oven; let cheesecake stay in oven 2 hours more (without opening).


Remove from oven; cool completely. Cover with plastic wrap; refrigerate until firm, at least 4 hours. Unmold before serving.